python制作曲线动画
动画是一个比较直观的方式展示你的设计过程,下文的codes可以方便按照你规定的点序进行逐点绘制
编写的步骤如下技术路线图
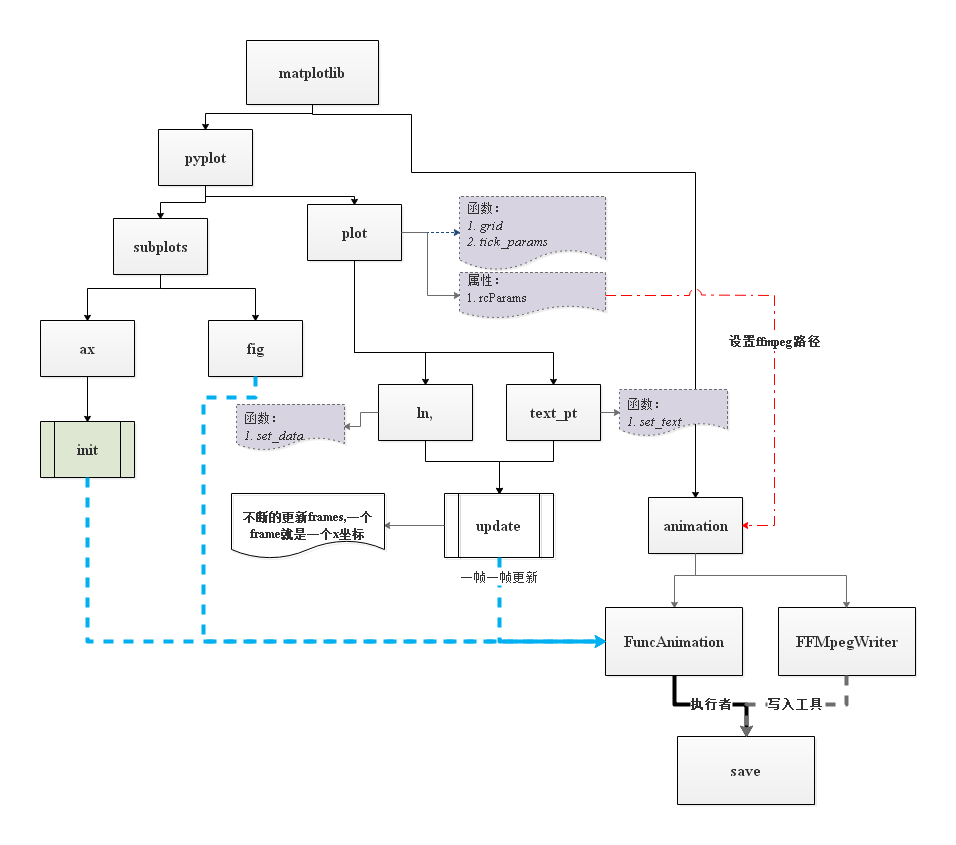
text绘制添加增加动画效果
mp4格式导出
在Ubuntu或者mac系统可以试用image 注意控制ffmpeg的路径
## 设置ffmpeg路径
  ffmpegpath = os.path.abspath("./ffmpeg/bin/ffmpeg.exe")
  plt.rcParams["animation.ffmpeg_path"] = ffmpegpath
  writer = animation.FFMpegWriter()
## 在sava函数中设置执行者
  anim.save('test_animation.mp4',writer=writer)
技术实现
import numpy as np
import matplotlib.pyplot as plt
import matplotlib.animation as animation
import os
import math

#fig, ax = plt.subplots()
fig, ax = plt.subplots(figsize=(10, 10))
#https://blog.csdn.net/xiaosebi1111/article/details/50617433  控制子图
xdata, ydata = [], []
ln, = plt.plot([], [], 'rs',animated=True)
text_pt = plt.text(8, -3, '', fontsize=18)

def init():
    ax.set_xlim(-1,18)
    ax.set_ylim(26,-5)
    return ln,

def update(frame):
    xdata.append(frame)
    #ydata.append(np.sin(frame))
    ydata.append(1)
    ln.set_data(xdata, ydata)
    ln.set_markersize(12)
    return ln,
# 16控制点数

def update2(frame):
    xdata.append(frame%16)
    #ydata.append(np.sin(frame))
    ydata.append(math.floor(frame/16) )
    ln.set_data(xdata, ydata)
    text_pt.set_text(f"Sector={frame%16+1}, VelocityBin={math.floor(frame/16)+1}" )
    return ln,text_pt,
def generateFrames(rows=16,cols=25):
   count=0;
   dataArray=np.zeros(16*25)
   for i in range(rows):
       dataArray[count]=i
       count=count+1
   for i in range(rows):
       for j in range(cols-1):
           dataArray[count]=(j+1)*rows+i
           count=count+1
   return dataArray

# 16控制点数
ffmpegpath = os.path.abspath("./ffmpeg/bin/ffmpeg.exe")
plt.grid(ls="--")
plt.tick_params(axis='both', which='major', labelsize=18)
x=np.linspace(0,16,16)
y=0.5*np.ones(16)
plt.plot(x,y,'r--')
plt.rcParams["animation.ffmpeg_path"] = ffmpegpath

##https://blog.csdn.net/sailist/article/details/79502007  ffmpeg路径
##https://www.cnblogs.com/endlesscoding/p/10308111.html   改进
writer = animation.FFMpegWriter()
#frames=np.linspace(0,16*25,16*25+1)
frames=generateFrames(16,25)
#frames=np.linspace(-np.pi,np.pi, 16)
anim = animation.FuncAnimation(fig, update2, frames=frames,interval=25,
                    init_func=init,blit=True)

# anim = animation.FuncAnimation(fig, update, frames=np.linspace(-np.pi,np.pi, 16),interval=10,
#                                init_func=init,blit=True)
#anim.save('test_animation.gif',writer='imagemagick')
anim.save('test_animation.mp4',writer=writer)
#plt.show()
结果展示
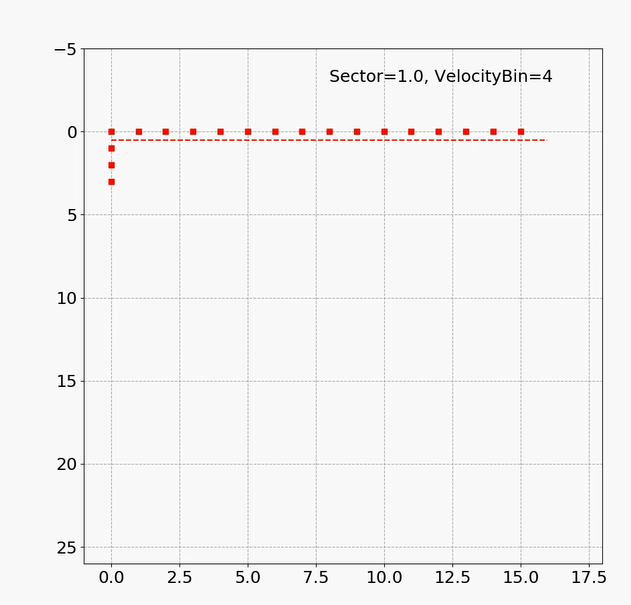
小结
只要修改好update函数,使其根据你设定的frames,就可以得到符合你需要的动画
Related
叶昭良
Engineer of offshore wind turbine technique research
My research interests include distributed energy, wind turbine power generation technique , Computational fluid dynamic and programmable matter.